


Photo by Steve Adams on Unsplash
Walk-through: Amazon API Gateway and Cognito with AWS Tools for PowerShell


Table of contents
- Objectives
- Why PowerShell?
- Solution Architecture
- Pre-requisites
- Workshop steps
- Step 1: Populate global variables and install additional PowerShell Modules
- Step 2: Add a custom domain to API Gateway
- Step 3: Set up and deploy a sample unauthorized API
- Step 4: Update DNS record
- Step 5: Test unauthenticated API
- Step 6: Create an Amazon Cognito User Pool with a Custom Domain Name
- Step 7: Create a Resource server and a custom scope
- Step 8: Create an API Client
- Step 9: Create Amazon API Gateway Authorizer from Amazon Cognito User Pool
- Step 10: Enable authentication for an API resource for API resource level 2
- Step 11: Test authenticated API for pet #2
- Summary
- Final Step: Cleanup
Contributors
- Sasha Tulchinskiy, Senior Solutions Architect, Deloitte
- Najeeb Danish, Technical Fellow, Deloitte
- Samuel Lefki, Solutions Architect, Deloitte
Objectives
In this walk-through, you will see examples of using AWS Tools for PowerShell for setting up and testing of:
- API Gateway and Cognito Hosted UI with custom Domain Names
- Sample Edge-optimized REST API
- Cognito Authorizer for API Gateway
Why PowerShell?
A primary reason to use an imperative method of AWS resources creation and configuration in this walk-through is to slow down and give yourself time to process results of the operation, thus getting a deeper understanding of how it works.
Choice of AWS Tools for PowerShell is mostly a personal preference and desire to fill a gap of readily available script examples for Amazon API Gateway and Cognito.
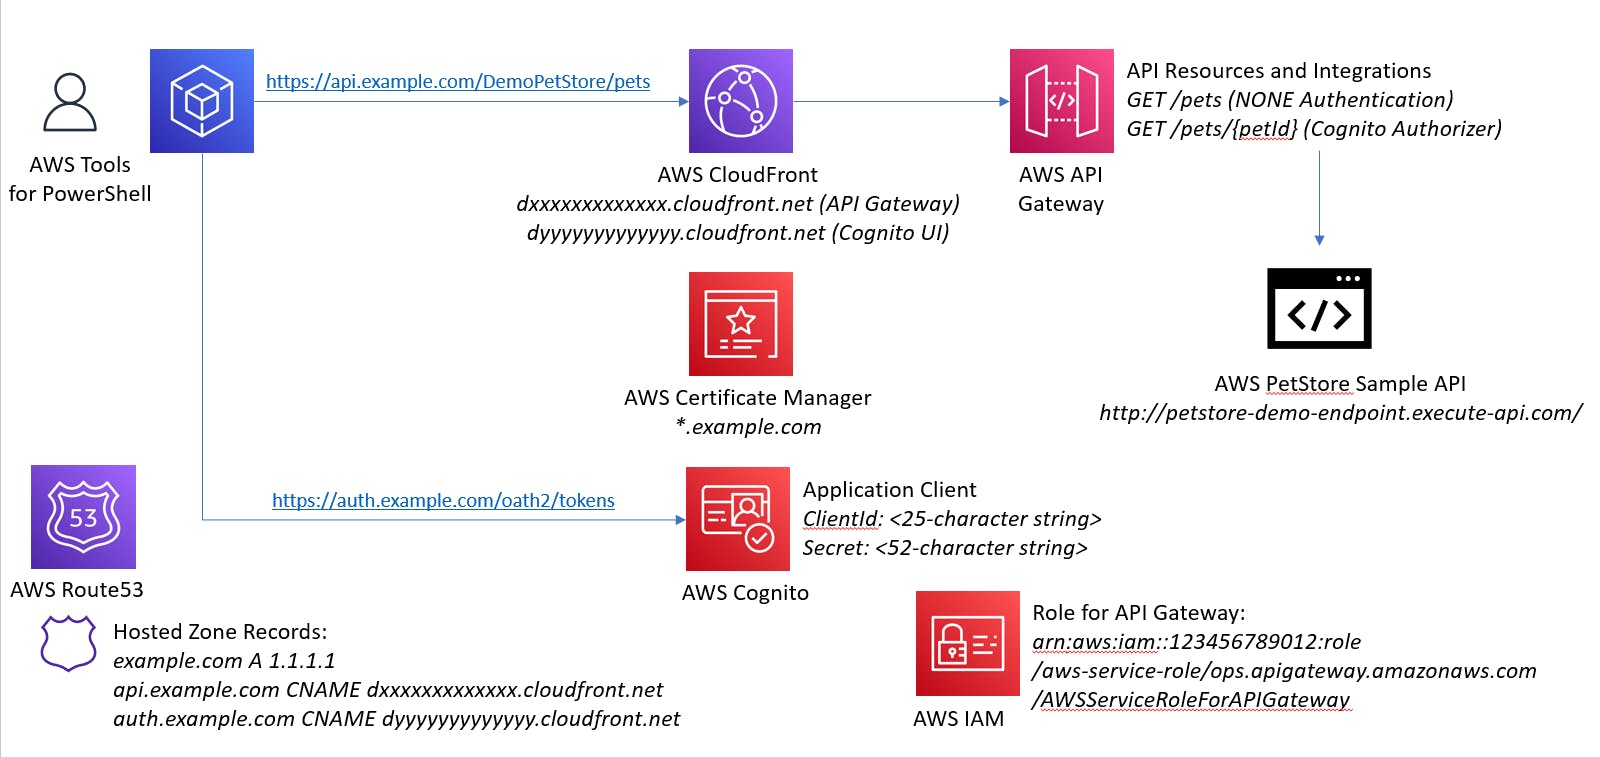
Solution Architecture
Pre-requisites
This walk-through assumes that you already have:
- AWS account with Full Admin privileges
- Registered Route53 domain and a public hosted zone with an apex A record
- Wildcard certificate for your domain in Amazon Certificate Manager
- Laptop with installed AWS Tools for PowerShell or access to CloudShell through AWS Console
- Basic knowledge of PowerShell
Workshop steps
Step 1: Populate global variables and install additional PowerShell Modules
A few modules may need to be installed to provision resources and interpret results
install-module -name JWTDetails, AWS.Tools.ApiGateway, AWS.Tools.Route53, AWS.Tools.CognitoIdentityProvider
# See https://github.com/darrenjrobinson/JWTDetails
Do not forget to update the code below to match your environment, starting with AWS account number (placehoder 123456789012 is used in code snippets below)
# Pre-requisites
$Route53Domain = 'example.com'  # Existing registered Domain name
$Route53HostedZone = 'Z1xxxxxxxxxx' # Existing hosted zone for the domain above
$ACMCertificateARN = 'arn:aws:acm:us-east-1:123456789012:certificate/b5640bd7-d6dc-4c46-8bda-5198cb60cc2e' # Existing Wildcard certificate for the domain above
$roleApiIgwArn = 'arn:aws:iam::123456789012:role/aws-service-role/ops.apigateway.amazonaws.com/AWSServiceRoleForAPIGateway' # Existing IAM Role for API Gateway to allow access to Cognito and CloudWatch Logs
AWS provides a sample Pet Store API, which we will be using to configure API Gateway resources.
# Externally-hosted PetStore sample APIs
$sampleURI1 = 'http://petstore-demo-endpoint.execute-api.com/petstore/pets'       # Will be used without authorization
$sampleURI2 = 'http://petstore-demo-endpoint.execute-api.com/petstore/pets/{id}'  # We will require ClientId and Client Secret for accessing specific pet's information
Feel free to change the variables below if you prefer different names for AWS resources.
$PrivateAPIName = 'MyPetStore'  # A name that you will see in API Gateway
$PublicAPIName = 'DemoPetStore' # A name that you will use with a custom domain name
$idpPool = 'petsIdP' # A name for Cognito User Pool
$authSubdomainPrefix = 'auth' # FQDN for Cognito Hosted UI, similar to auth.example.com
$oauthRSId = 'demopetstore' # Cognito Resource Server Id for PetStore
$oauthRSName = 'PetStore RS' # Cognito Resource Server Name for PetStore
$oauthScope = 'demopetstore/demopetstore.fullaccess' # OAuth scope that will be used for accessing one of API methods
$apiSubdomainPrefix  = 'api' # FQDN for API Gateway, similar to api.example.com
$apiStage = 'demo' # API Gateway Stage name
Step 2: Add a custom domain to API Gateway
A Cloud Front distribution will be created when a custom domain name is set up. The distribution type is Edge-optimized by default, but a Regional type can be provisioned by using EndpointConfiguration_Type parameter
$apiURI = $apiSubdomainPrefix + '.' + $Route53Domain
$resultAGDomain = New-AGDomainName -DomainName $apiURI -CertificateArn $ACMCertificateARN
$resultAGDomain.DistributionDomainName # Shows a DNS name like dxxxxxxxxxxx.cloudfront.net
Step 3: Set up and deploy a sample unauthorized API
During this step, API hierarchy for /pets/pet/{petId} is created and deployed to a stage of your choice
# Create a new REST API and disable a default AWS-provided endpoint to force use of a custom domain name
$api = New-AGRestApi -Name $PrivateAPIName -DisableExecuteApiEndpoint $true

# Create and configure a root resource "/" without integration
$apiResourceRoot = Get-AGResourceList -RestApiId $api.Id

# Create and configure a level 1 resource "/pets" by specifying the root resource Id as a parent
$apiResource1 = New-AGResource -RestApiId $api.Id -ParentId $apiResourceRoot.Id -PathPart 'pets'
$result1 = Write-AGMethod -RestApiId $api.Id -ResourceId $apiResource1.Id -HTTPMethod Get -AuthorizationType NONE
$result1Status = Write-AGMethodResponse -RestApiId $api.Id -ResourceId $apiResource1.Id -HTTPMethod GET -StatusCode 200
$resultIntegration1 = Write-AGIntegration -RestApiId $api.Id -ResourceId $apiResource1.Id -HTTPMethod GET -Type HTTP -IntegrationHTTPMethod GET -URI $sampleURI1
$resultIntegration1Status = Write-AGIntegrationResponse -RestApiId $api.Id -ResourceId $apiResource1.Id -HTTPMethod GET -StatusCode 200 -SelectionPattern ''

# Create and configure a level 2 resource "/pets/{petId}" by specifying the level 1 resource Id as a parent
$apiResource2 = New-AGResource -RestApiId $api.Id -ParentId $apiResource1.Id -PathPart '{petId}'
$Resource2Parameter = @{
    'method.request.path.petId'=$true
    }
$result2 = Write-AGMethod -RestApiId $api.Id -ResourceId $apiResource2.Id -HTTPMethod Get -AuthorizationType NONE -RequestParameter $Resource2Parameter
$result2Status = Write-AGMethodResponse -RestApiId $api.Id -ResourceId $apiResource2.Id -HTTPMethod GET -StatusCode 200

$Integration2Parameter = @{
    'integration.request.path.id'='method.request.path.petId'
    }
$resultIntegration2 = Write-AGIntegration -RestApiId $api.Id -ResourceId $apiResource2.Id -HTTPMethod GET -Type HTTP -IntegrationHTTPMethod GET -URI $sampleURI2 -RequestParameter $Integration2Parameter
$resultIntegration2Status = Write-AGIntegrationResponse -RestApiId $api.Id -ResourceId $apiResource2.Id -HTTPMethod GET -StatusCode 200 -SelectionPattern ''

# Deploy the API
$resultDeployment = New-AGDeployment -RestApiId $api.Id -StageName $apiStage
# Map deployed API stage to a path under the custom domain name
$resultMapping  = New-AGBasePathMapping -RestApiId $api.Id -BasePath $PublicAPIName -DomainName $apiURI -Stage $apiStage
Step 4: Update DNS record
Desired custom DNS name needs to be registered as a CNAME of a Cloud Front distribution that was created earlier during API Gateway Custom Domain step. Alternatively, you can wait for completion of Cloud Front distribution initiation (about 40 minutes) and configure an Alias record in Route53
$resultAPIFQDN = $resultAGDomain.DistributionDomainName
$Route53APIChange = New-Object Amazon.Route53.Model.Change
$Route53APIChange.Action = "UPSERT"
$Route53APIChange.ResourceRecordSet = New-Object Amazon.Route53.Model.ResourceRecordSet
$Route53APIChange.ResourceRecordSet.Name = $apiURI
$Route53APIChange.ResourceRecordSet.Type = "CNAME"
$Route53APIChange.ResourceRecordSet.TTL = 600
$Route53APIChange.ResourceRecordSet.ResourceRecords.Add(@{Value=$resultAPIFQDN})
Edit-R53ResourceRecordSet -HostedZoneId $Route53HostedZone -ChangeBatch_Change $Route53APIChange
Step 5: Test unauthenticated API
We will make a simple REST API call to obtain a list of all pets in the store
$apiCall1 = 'https://' + $apiURI + $PublicAPIName + '/pets'
$apiResult = Invoke-RestMethod -Method Get -Uri $apiCall1
You should receive the following output
id type  price
-- ----  -----
 1 dog  249.99
 2 cat  124.99
 3 fish   0.99
Step 6: Create an Amazon Cognito User Pool with a Custom Domain Name
Create a new Cognito User Pool will all default settings and add a Custom Domain Name, then wait until, similar to what happened during API Gateway provisioning, a Cloud Front distribution is created
$resultIdPPool = New-CGIPUserPool -PoolName $idpPool

$authDomain = $authSubdomainPrefix + '.' + $Route53Domain
$resultIdPDomain = New-CGIPUserPoolDomain -Domain $authDomain -CustomDomainConfig_CertificateArn $ACMCertificateARN -UserPoolId $resultIdPPool.Id
Similarily to how we set up a custom DNS name for API Gateway, create a record for Cognito Hosted UI
$Route53AuthChange = New-Object Amazon.Route53.Model.Change
$Route53AuthChange.Action = "UPSERT"
$Route53AuthChange.ResourceRecordSet = New-Object Amazon.Route53.Model.ResourceRecordSet
$Route53AuthChange.ResourceRecordSet.Name = $authDomain
$Route53AuthChange.ResourceRecordSet.Type = "CNAME"
$Route53AuthChange.ResourceRecordSet.TTL = 600
$Route53AuthChange.ResourceRecordSet.ResourceRecords.Add(@{Value=$resultIdPDomain})
Edit-R53ResourceRecordSet -HostedZoneId $Route53HostedZone -ChangeBatch_Change $Route53AuthChange
Step 7: Create a Resource server and a custom scope
Cognito Resource Server is needed to support a custom OAuth Scope
$resultRS = New-CGIPResourceServer -Identifier $oathRSId -Name $oauthRSName -Scope $oauthScope -UserPoolId $resultIdPPool.Id
Step 8: Create an API Client
For machine-to-machine communications, we will create an application client with a randomized Name, ClientId and ClientSecret, custom OAuth configuration
$ClientName = 'API-Client-'+(Get-Random).ToString()
$resultAPIClient = New-CGIPUserPoolClient -UserPoolId $resultIdPPool.Id -ClientName $ClientName -GenerateSecret $true -AllowedOAuthScope $oauthScope -AllowedOAuthFlow 'client_credentials' -SupportedIdentityProvider 'COGNITO'
$resultAPIClient.ClientId # Will show a 25-character alpha-numeric string
$resultAPIClient.ClientSecret #  Will show a 52-character alpha-numeric string
Step 9: Create Amazon API Gateway Authorizer from Amazon Cognito User Pool
Now we are ready to create an API Gateway Authorizer
$authPoolArn = (Get-CGIPUserPool -UserPoolId $resultIdPPool.Id).arn
$resultAPIAuthorizer = New-AGAuthorizer -RestApiId $api.Id -AuthorizerCredential $roleApiIgwArn -IdentitySource 'method.request.header.Authorization' -Name 'PetsCognitoAuthorizer' -Type 'COGNITO_USER_POOLS' -ProviderARNs $authPoolArn
Step 10: Enable authentication for an API resource for API resource level 2
Once Authorizer is created, we can change /pets/pet/{petId} API Get method to require Cognito access token, but leave higher-level APIs unauthenticated.
$authUpdate1 = New-Object Amazon.APIGateway.Model.PatchOperation
$authUpdate1.op = 'replace'
$authUpdate1.path = '/authorizationType'
$authUpdate1.value = 'COGNITO_USER_POOLS'

$authUpdate2 = New-Object Amazon.APIGateway.Model.PatchOperation
$authUpdate2.op = 'replace'
$authUpdate2.path = '/authorizerId'
$authUpdate2.value = $resultIdPPool.Id

$authUpdate3 = New-Object Amazon.APIGateway.Model.PatchOperation
$authUpdate3.op = 'add'
$authUpdate3.path = '/authorizationScopes'
$authUpdate3.value = $oauthScope

$method2 = Update-AGMethod -RestApiId $api.Id -HttpMethod GET -ResourceId $apiResource2.Id -PatchOperation $authUpdate1, $authUpdate2, $authUpdate3
Step 11: Test authenticated API for pet #2
Note that the access token acquired by the script below cannot be used for testing the Cognito Authorizer through AWS Console (you will need an identity token)
$pairClientCreds = "${$resultAPIClient.ClientId}:${$resultAPIClient.ClientSecret}"
$bytes = [System.Text.Encoding]::ASCII.GetBytes($pairClientCreds)
$base64 = [System.Convert]::ToBase64String($bytes)
$basicAuthValue = "Basic $base64"
$autHeaders = @{
    Authorization = $basicAuthValue
    ContentType = 'application/x-www-form-urlencoded'
    }
$authBody = @{
    grant_type='client_credentials'
    scope = $oauthScope
    }
$authTokenUri = 'https://' + $authDomain + '/oauth2/token'
$resultToken = Invoke-WebRequest -Verbose -Method POST -Uri $AuthTokenUri -Body $authBody -Headers $autHeaders
$accessToken = ($resultToken.Content | ConvertFrom-Json).access_token

# Check Access Token content
Get-JWTDetails $accessToken

# Form the Authorization header and pass it together with the sample API
$Authorization = 'Bearer ' + $accessToken
$apiHeaders = @{
    Authorization=$Authorization
}
$apiCall2 = 'https://' + $apiURI + $PublicAPIName + '/pets/2'
$apiResult = Invoke-RestMethod -Method Get -Headers $apiHeaders -Uri $apiCall2
$apiResult
You should receive the following output
id type  price
-- ----  -----
 2 cat  124.99
And the access token would look like below. Notice that it is an "access" token with a custom OAuth scope, refers a newly-provisioned Cognito pool with Application ClientId and expires in one hour.
sub            : 4l4o7oct0lc0dgodk2l9j5lb8
token_use      : access
scope          : demopetstore/demopetstore.fullaccess
auth_time      : 1661784270
iss            : https://cognito-idp.us-east-1.amazonaws.com/us-east-1_OcwLAkR7k
exp            : 1661787870
iat            : 1661784270
version        : 2
jti            : 695887a1-ec1c-4b8c-8000-5c64c15a3e86
client_id      : 4l4o7oct0lc0dgodk2l9j5lb8
sig            : JNwk+rfUbCfl9hU3RKpidRsl8w7xyk7JDoj36FqB2R4XrmuwM2+Vcm8i9Fcp1g/93Qom74/1KEJTjiPAuItOE5qkBngQDexer6c9hggqfcYVW2LFTb3QqNRSgwZzfu0FPPd3VxbFOMyaWyaIhTlpQkmljo74t7F1vm+ZLr8nfuXBLI7va4AN24UTMOdZaE6ijrTuSR1NKV54dqasAL2d7w3OM45quWnVCpL9PCDL6r3NpO0toJau+6uQCXkGhDSa/6VbXhD1hwKivCJ4GKKYvfAMYPXs/EHQfBCY4HP8sbSX7GXFJDJcnPePlaJlPEj3N
wcYcL/kHXql14nnSDfD4w==
expiryDateTime : MM/DD/YYYY H:MM:SS
timeToExpiry   : 00:59:59.8355653
Summary
In this brief walk-through, you have learned PowerShell cmdlets to manage Cognito-based authentication for API Gateway application clients. We followed a very simple example and did not attempt to build a production-grade architecture. Keep in mind that AWS resources created in this walk-through will costs you a very few cents - the beauty of Cloud utility on-demand compute!
Find more PowerShell commands at AWS Tools for PowerShell Documentation,
Final Step: Cleanup
A downside of using imperative configuration tools like PowerShell scripts is there is no simple way to reverse all the changes. To save time, we recommend removal of provisioned resources through AWS Console.