


Bootstrapping an environment with Amazon CloudShell
What if you have to start from scratch?


Contributors:
- Sasha Tulchinskiy, Senior Solutions Architect, Deloitte;
- Allen Brodjeski, Senior Solution Architect, Deloitte
Introduction
Sometimes you need to set up a brand-new non-production environment for a quick learning exercise or proof-of-concept. This walk-through takes you through steps of using Amazon CloudShell for bootstrapping an AWS account with Terraform and VPC configuration, with an extra bonus of setting up a CodeCommit repository for future Terraform expansion.
Why Amazon CloudShell
Amazon CloudShell offers a Linux-based Command Line Interface with a lot of pre-installed tools (AWS CLI, Git, PowerShell, etc.) as long as you are able to access to AWS Management Console with appropriate permissions. It is just there!
Step by Step
Pre-requisites
You need to be in an Administrator role to access the CloudShell and being able to provision AWS resources with Terraform.
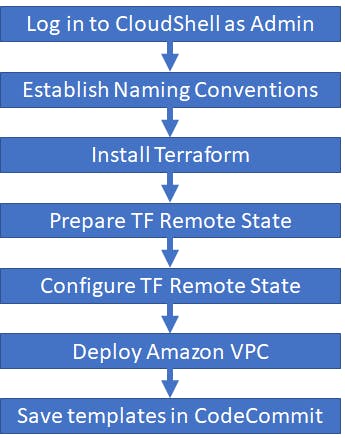
Big Picture
Naming Conventions
Some of AWS resources need to have unique names (for example, S3 buckets). Replace "YOURNAMEHERE" with something you like and replace AWS Region name if needed.
export myBucket="YOURNAMEHERE-terraform-state"
export myKey="YOURNAMEHERE-platform"
export myTable="YOURNAMEHERE-terraform-lock"
export myRegion="us-east-1"
export myName="John Doe"
export myEmail="jdoe@nosuchdomain.com"
export myRepo="YOURNAMEHERE"
Install Terraform
Next, we will be installing nano (my favorite editor) and Terraform v1.3.6
sudo yum install nano -y
git clone https://github.com/tfutils/tfenv.git ~/.tfenv
mkdir ~/bin
ln -s ~/.tfenv/bin/* ~/bin/
tfenv install 1.3.6
tfenv use 1.3.6
terraform --version
mkdir $myRepo && cd $myRepo
Prepare Terraform Remote State
Our objective is to use Terraform Remote State with S3 bucket and Dynamo DB lock table. But first, we will create the bucket and table while using local state file
cat > providers.tf <<EOF
provider "aws" {
  region = "$myRegion"
}
EOF

cat > remote-state.tf <<EOF
resource "aws_s3_bucket" "terraform_state" {
  bucket = "$myBucket"

  # Prevent accidental deletion of this S3 bucket
  lifecycle {
    prevent_destroy = true
  }
}

resource "aws_s3_bucket_versioning" "enabled" {
  bucket = aws_s3_bucket.terraform_state.id
  versioning_configuration {
    status = "Enabled"
  }
}

resource "aws_s3_bucket_server_side_encryption_configuration" "default" {
  bucket = aws_s3_bucket.terraform_state.id

  rule {
    apply_server_side_encryption_by_default {
      sse_algorithm = "AES256"
    }
  }
}

resource "aws_dynamodb_table" "terraform_locks" {
  name         = "$myTable"
  billing_mode = "PAY_PER_REQUEST"
  hash_key     = "LockID"

  attribute {
    name = "LockID"
    type = "S"
  }
}
EOF
Now we are ready to apply Terraform files to create Remote State configuration resources
terraform init -force-copy
terraform apply -auto-approve
Configure Terraform to use Remote State
We are ready to switch from local to Remote State configuration and create folder structure for future Terraform modifications
cat >> remote-state.tf <<EOF

terraform {
  backend "s3" {
    bucket         = "$myBucket"
    key            = "$myKey"
    region         = "$myRegion"
    encrypt        = true
    dynamodb_table = "$myTable"
  }
}
EOF
Then run Terraform init and apply again
terraform init -force-copy
terraform apply -auto-approve
We have Remote State in S3 now!
Deploy a VPC
We will use AWS-provided VPC module to create a VPC with multiple private and public Subnets across three AZ. You can tailor the IP ranges and subnet names in the code below.
cat > main.tf <<EOF
module "vpc" {
  source  = "terraform-aws-modules/vpc/aws"
  version = "3.18.1"

  name = local.name
  cidr = local.vpc_cidr

  azs  = local.azs
  public_subnets  = ["10.0.1.0/24","10.0.2.0/24","10.0.3.0/24"]
  public_subnet_names = ["PublicNetworkSubnet1","PublicNetworkSubnet2","PublicNetworkSubnet3"]
  private_subnets = ["10.0.11.0/24","10.0.12.0/24","10.0.13.0/24","10.0.21.0/24","10.0.22.0/24","10.0.23.0/24","10.0.31.0/24","10.0.32.0/24","10.0.33.0/24"]
  private_subnet_names = ["PrivateControlSubnet1","PrivateControlSubnet2","PrivateControlSubnet3","PrivateContainerSubnet1","PrivateContainerSubnet2","PrivateContainerSubnet3","PrivateDataSubnet1","PrivateDataSubnet2","PrivateDataSubnet3"]

  enable_nat_gateway   = true
  create_igw           = true
  enable_dns_hostnames = true
  single_nat_gateway   = true

  manage_default_network_acl    = true
  default_network_acl_tags      = { Name = "\${local.name}-default" }
  manage_default_route_table    = true
  default_route_table_tags      = { Name = "\${local.name}-default" }
  manage_default_security_group = true
  default_security_group_tags   = { Name = "\${local.name}-default" }
}
EOF

cat > data.tf << EOF
# Find the user currently in use by AWS
data "aws_caller_identity" "current" {}

# Region in which to deploy the solution
data "aws_region" "current" {}

# Availability zones to use in our solution
data "aws_availability_zones" "available" {
  state = "available"
}
EOF

cat > outputs.tf <<EOF
output "vpc_id" {
  description = "The ID of the VPC"
  value       = module.vpc.vpc_id
}
EOF

cat > locals.tf <<EOF
locals {

  name            = basename(path.cwd)
  region          = data.aws_region.current.name
  cluster_version = "1.23"

  vpc_cidr = "10.0.0.0/16"
  azs      = slice(data.aws_availability_zones.available.names, 0, 3)

}
EOF
Guess what? Terraform init and apply again!
terraform init -force-copy
terraform apply -auto-approve
Create a CodeCommit Repository
As we do not want to manage our environment from CloudShell only, let's preserve all files in CodeCommit. It will help us to set up a Infrastructure-as-Code pipeline for deploying AWS resources with Terraform. Note that CloudShell is pre-configured to use IAM authentication for Amazon CodeCommit and we will:
- Configure user name and email information for commit messages
- Create an empty repository in CodeCommit
- Add our local project files to the repository
git config --global user.name $myName
git config --global user.email $myEmail
aws codecommit create-repository --repository-name $myRepo --repository-description "AWS account bootstrapping with Amazon CloudShell"
cat > .gitignore <<EOF
**/.terraform/*
*.hcl
*.tfstate
*.tfstate.*
crash.log
crash.*.log
override.tf
override.tf.json
*_override.tf
*_override.tf.json
.terraformrc
terraform.rc
EOF
git init
git add .
git status
git remote add origin codecommit::$myRegion://$myRepo
git commit -m "initial commit"
git push --set-upstream origin master
Conclusion
When you have to quickly bootstrap a brand-new AWS account with a non-default VPC while using Terraform, Amazon CloudShell shall be your first candidate! Just keep in mind that some portions of CloudShell environment configuration may need to be reset after your session expires and a new shell environment is launched for you.
Happy Cloud Sailing!